Headset Setup
This page covers everything you need to prepare a Quest headset for QuestNav: enabling Developer Mode, applying the required system settings, and installing the QuestNav app.
Prerequisites
The QuestNav Setup Page handles almost everything for you, but you still need to:
- Complete the initial Quest setup (Meta account, guardian boundaries, system tutorials) if this is a brand-new headset
- Enable Developer Mode on the headset — see below
Enable Developer Mode
Developer Mode is required by both the QuestNav Setup Page and the manual procedure. You only need to do this once per headset.
Requirements
- A Meta Developer Account (free, must be verified at developers.meta.com/manage/verify)
- The Meta Horizon mobile app installed on a phone paired with your Quest
- A USB-C data cable (the cable that ships with the Quest works)
Steps
- Open the Meta Horizon app on your phone
- Tap the headset icon in the toolbar
- Tap your paired headset at the top of the screen
- Tap Headset Settings → Developer Mode
- Toggle Developer Mode On
- Restart your Quest headset for the change to take effect
For the official walkthrough (with screenshots and a video), see Enable developer mode on your headset on the Meta developer docs.
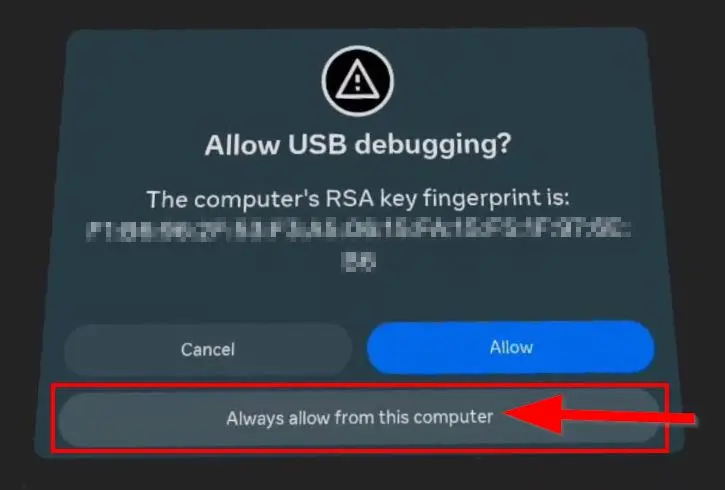
Authorize USB Debugging
After enabling Developer Mode, connect the Quest to your computer with a USB-C data cable. When prompted inside the headset, select Always allow from this computer to authorize USB debugging. This lets the QuestNav Setup Page (and ADB / Meta Quest Developer Hub if used) communicate with the headset.
Run the QuestNav Setup Page
With Developer Mode enabled and USB debugging authorized, the QuestNav Setup Page handles the rest:
- Keep the Quest connected to your computer over USB
- Open setup.questnav.gg in a browser
- Follow the on-screen prompts
The page applies every required system setting (Wi-Fi, Bluetooth, Guardian, power, screen timeout) and installs two apps for you:
- QuestNav itself
- QuestNav KeepAwake — a companion app that prevents the Quest from sleeping during operation. The Quest's built-in sleep timers can't be disabled through normal Android settings on Quest 3 and 3S, so KeepAwake holds a wake lock and continuously signals the headset that it's being worn. It auto-starts on boot and runs in the background.
Next Steps
With your Quest configured and QuestNav installed, proceed to Mounting to learn how to attach the headset to your robot.
The manual procedure (configuring system settings yourself and installing the APK via ADB, MQDH, or SideQuest) lives in Development → Manual Headset Setup. It is preserved for reference and edge cases — for normal team setup, use the QuestNav Setup Page above.